


How Automated Visual Testing Boosts QA Accuracy and User Experience?

Getting the look and feel of an app right isn’t just about code working behind the scenes; it’s about what the user actually sees. The tricky part? An interface that looks fine on your laptop can suddenly shift, break, or look compromised on a phone or in another browser. Testers, developers, and QA folks all run into this sooner or later.
The practical fix is visual testing in software testing. Instead of relying on guesswork or endless manual checks, you take screenshots of your app and compare them against what the design should look like. If something’s off, even by a few pixels, you catch it early. The end result is an interface that feels consistent and polished no matter where it runs.
- What Is Visual Testing?
- Why Automated Visual Testing?
- Types of Visual Testing
- How to Implement Visual Testing?
- How Do Leading Visual Testing Tools Integrate with CI/CD Pipelines for Continuous Monitoring?
- Visual Testing Best Practices
- Common Visual Testing Example
- How Does Visual Testing Improve UI Consistency Across Multiple Devices?
- Benefits of Visual Testing
- Conclusion
What Is Visual Testing?
This adept at identifying even the slightest visual differences between application screenshots and baseline photos. These variations, ranging from a few pixels to significant layout changes, are swiftly detected and resolved. This early intervention ensures preserving a polished and user-friendly design.
In visual testing, a quality assurance procedure, the visual components of an application are confirmed to seem right to end users. Unlike conventional testing techniques that concentrate on functionality, it aims especially at the appearance and feel of the user interface (UI). Across several devices and browsers layout consistency, color correctness, font rendering, element placement, and responsiveness are checked across several devices and browsers.
Importance:
- Baseline Images: Reference images that represent the expected appearance of the application.
- Visual Differences: Variations between the current state of the application and the baseline images.
SUGGESTED READ - Types of Testing Every QA Must Know
Why Automated Visual Testing?
Automated visual testing is essential because it offers:
- Efficiency and Speed: Compared to manual tests, it compares screenshots quickly, saving time.
- Consistency and Accuracy: Offers unbiased comparisons that lower human mistakes and point up even little differences.
- Scalability: Managing a lot of visual tests on different browsers and devices guarantees thorough coverage.
- Early Visual Bug Detection: Constantly monitors visual elements to identify problems early in development.
- Cost-Effectiveness: Avoiding costly adjustments later on and reducing the requirement for a lot of manual testing lowers total testing expenses.
- Enhancing User Experience: Consistent, excellent UI is guaranteed, increasing user satisfaction and retention.
Types of Visual Testing
| Type | Description | Functionality |
|---|---|---|
| Pixel-by-Pixel Comparison | Compares screenshots at the pixel level to detect any differences. | Ensures high accuracy for pixel-perfect designs. |
| Layout Comparison | Focuses on the structure and arrangement of elements on a page. | Identifies misalignment and layout issues. |
| Component Comparison | Targets specific UI components rather than entire pages. | Tests reusable components across the application. |
| DOM-based Comparison | Compares the Document Object Model (DOM) structure rather than visual appearance. | Detects issues with element attributes and styles. |
| AI-Powered Comparison | Utilizes AI visual testing to understand visual content contextually. | Flexible and handles minor non-critical changes. |
How to Implement Visual Testing?
Getting started with visual testing isn’t complicated, but it does take a clear process. Here’s how most teams put it into practice:
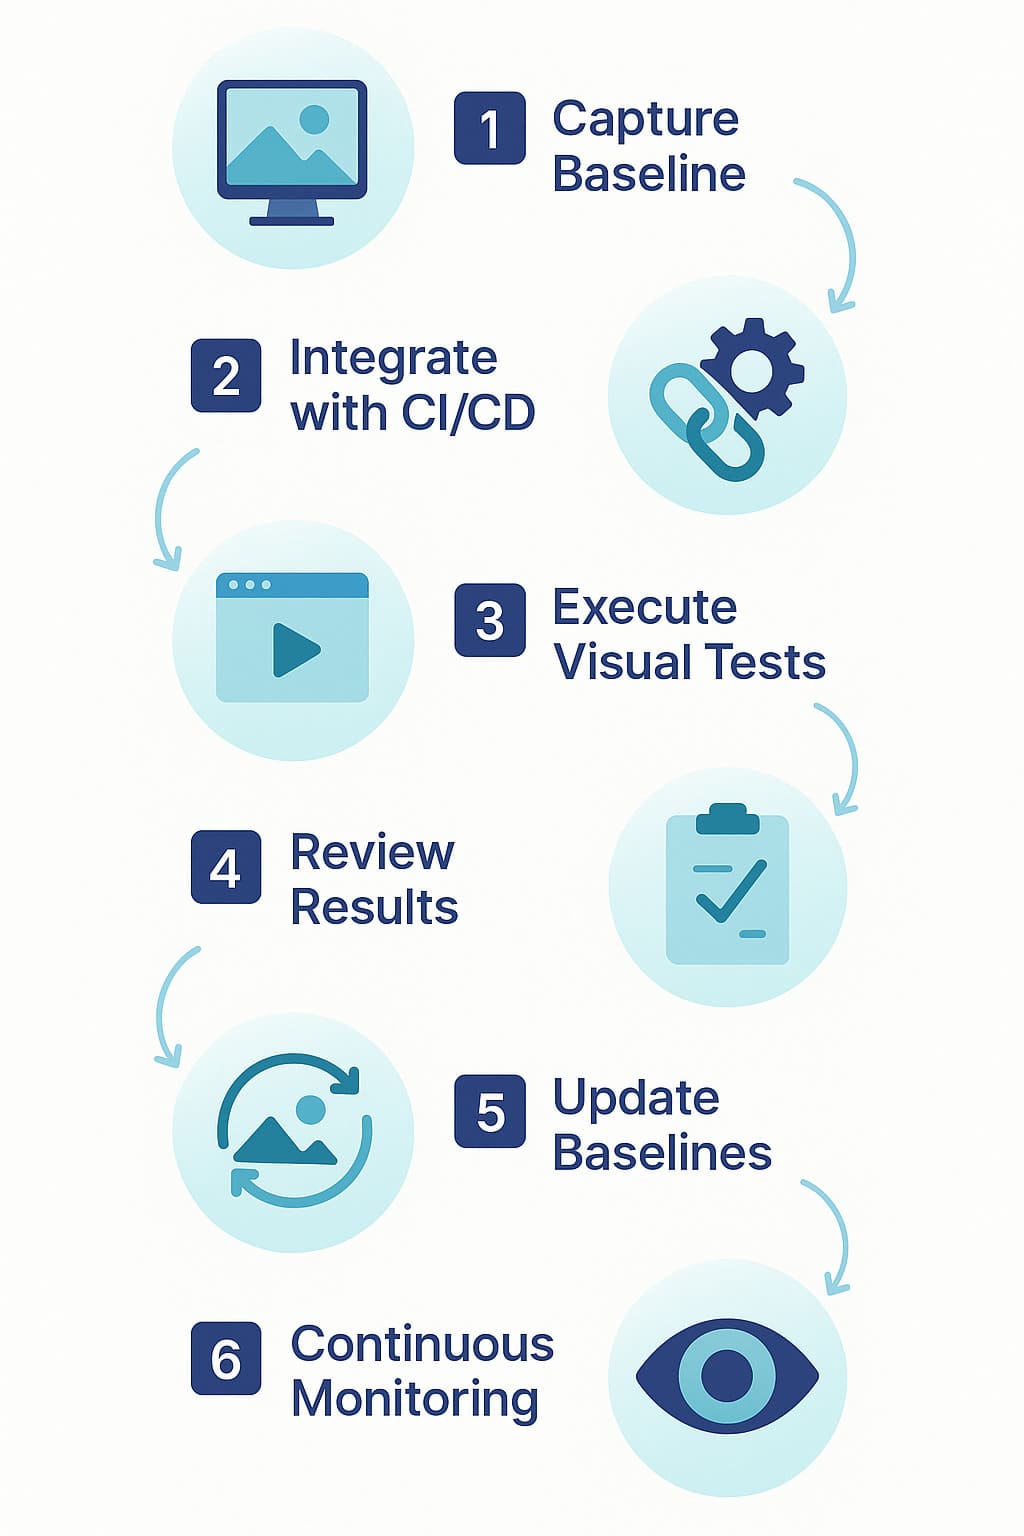
Step 1: Capture Baseline Images
Think of baselines as your “ground truth.” Take screenshots of key pages and components when the app is stable and behaving as expected. These images become the reference point for every future comparison.
Step 2: Hook Into Your CI/CD Pipeline
You don’t want to run these checks manually every time. Add visual tests into your build pipeline, Jenkins, CircleCI, GitHub Actions, whatever you use, so they trigger automatically after deployment to a test environment.
Step 3: Run the Visual Tests
Once everything’s wired up, run your first set of comparisons. The tool will flag differences between the new screenshots and your baselines. Do a couple of manual runs at the start to make sure the setup is working before letting it run automatically on each build.
Step 4: Review the Results
Not every difference is a bug. Some changes will be intentional. Look through the reports, decide what’s a real issue versus an acceptable change, and pass the valid bugs back to the dev team.
Step 5: Update Baselines When the UI Changes
When the design team updates the UI intentionally, update your baseline images so they reflect the new look. Always double-check before approving new baselines so you don’t accidentally “bless” a real defect.
Step 6: Keep It Running
Make visual tests part of your regular routine. Run them nightly or with every deployment. The goal is to catch visual issues early and keep the UI consistent over time.
How Do Leading Visual Testing Tools Integrate with CI/CD Pipelines for Continuous Monitoring?
Leading visual testing tools integrate with CI/CD pipelines for continuous monitoring by embedding visual checks directly into build workflows. The general steps include:
- Install the tool’s plugin or CLI for Jenkins, GitHub Actions, or CircleCI.
- Capture and store baseline images in version control.
- Run automated comparisons on every pull request or build.
- Generate diff reports highlighting mismatches.
- Allow baseline updates through approval workflows.
Example GitHub Actions snippet:
- name: Run Visual Tests
  uses: vendor/visual-test-action@v1
  with:
    baseline-path: ./baselines
	test-url: https://staging.app
This approach ensures visual testing in CI/CD pipelines provides early alerts on UI regressions before release.
Visual Testing Best Practices
If you want your visual tests to actually be useful (and not just noise), here are a few habits that make all the difference:
- Keep Clean Baselines: Take your baseline screenshots when the app is stable and properly configured. These images are your reference point, if they’re messy or inconsistent, everything else will be too.
- Automate in Your Pipeline: Don’t rely on someone remembering to click “run.” Plug your visual tests straight into the CI/CD pipeline so they run automatically with every build. That way you catch visual bugs as early as possible.
- Set Tolerance Levels: Not every pixel shift matters. Configure your tool with sensible thresholds so small, harmless changes (like anti-aliasing) don’t flood you with false positives.
- Refresh Baselines When the UI Changes: When the design team makes intentional updates, update your baselines to match. Document these changes so you always know what “correct” is supposed to look like.
- Collaborate with Design and Development Teams: Involve both design and development teams in the visual QA testing process. This collaboration ensures that any detected issues are promptly addressed and aligned with the overall design vision.
Common Visual Testing Example
Cross-Browser Visual Testing
It ensures your application consistently appears across Chrome, Firefox, Safari, and Edge browsers. This process detects issues like:
- Layout Shifts
- Font Rendering Differences
- CSS Inconsistencies
SUGGESTED READ - Mobile App Testing
How Does Visual Testing Improve UI Consistency Across Multiple Devices?
Visual testing improves UI consistency across multiple devices by ensuring that your application’s layout, fonts, and styles render properly across desktops, mobiles, and tablets. Tools compare screenshots at different breakpoints against baselines to:
- Detect layout shifts across viewports.
- Validate responsive design on small vs. large screens.
- Catch browser-specific CSS rendering issues.
- Ensure consistent branding and colors across devices.
Responsive Design Verification
When it comes to mobiles, tablets, and desktops, ensuring that the application’s UI adapts to different screen sizes and resolutions is necessary. It helps detect:
- Element Overlaps
- Disappearing Elements
Benefits of Visual Testing
- Catch Bugs Early: The earlier you spot visual issues, the cheaper they are to fix. Visual testing flags problems during development, so they don’t slip into production and frustrate users later.
- Improve the User Experience: A clean, consistent UI goes a long way. Automated visual testing makes sure the application looks and works the way it should across different devices and browsers. Happier users stick around longer.
- Cut Down on Manual Work: No one enjoys staring at screens, pixel by pixel. Visual testing takes that off your plate so testers can focus on more meaningful work. Less tedium also means fewer human errors. Over time, this strengthens your overall visual QA testing practices.
- Cost Savings: Early detection of visual faults and reduced need for in-depth manual testing are two ways it can cut overall testing expenses. Long-term savings are further increased by preventing post-release problems that require expensive solutions.
- Increased Accuracy and Consistency: Even the tiniest visual variations are picked up by AI visual testing tools since they offer objective and constant comparisons. Using subjective and easily overlooked manual testing makes this degree of accuracy hard to come.
Conclusion
Focusing on visual consistency through rigorous testing helps build user trust and satisfaction, ultimately contributing to the success of your application. Embrace automated visual testing as a key component of your quality assurance strategy to deliver flawless user interfaces that meet the highest standards of excellence.
Investing in a comprehensive visual automation approach streamlines the process of maintaining UI quality and significantly reduces the risk of visual defects reaching your users. Ready to enhance your visual testing strategy? Start integrating AI visual testing into your workflow with the ACCELQ Free Trial and see the difference it makes in the quality of your application.
ACCELQ Team
ACCELQ is an AI-powered Codeless Test Automation platform on cloud that seamlessly automates Web UI, API, Mobile, and Desktop. ACCELQ was analyzed as a leader in the latest Continuous Test Automation platform Forrester research.

You Might Also Like:
 How Automated Visual Testing Boosts QA Accuracy and User Experience?
How Automated Visual Testing Boosts QA Accuracy and User Experience?
 Testing vs Debugging: When to Test & When to Fix Bugs?
Testing vs Debugging: When to Test & When to Fix Bugs?
 Developing an Effective Quality Strategy and Testing the Model