According to Statista, the number of smartphone users will rise to 6.5 billion by the end of 2022. Add another 1.3 billion tablet users, and it’s clear that mobile devices and the applications driving them are penetrating every stratum of society.
As of 2021, Google Play Store sufficed 3.48 million mobile apps. The Apple play store wasn’t far behind with 2.22 million apps. Some rough math is all you need to comprehend that there would be quite similar, if not identical, apps with near-identical functionalities to yours available across these stores.
Ready to Get Started?
Let our team experts walk you through how ACCELQ can assist you in achieving a true continuous testing automation
Clearly, you can’t afford to risk losing ground to your competitors by launching a substandard product. If you anticipate bringing out an app, one of the most important steps would be carrying out thorough mobile app testing.
As your app evolves, so do the complexities that come with it. There are many aspects to consider and identify during the thorough testing of your app.
On that note, this article will help you understand the basics of mobile app testing via a step-by-step approach to pursue it.
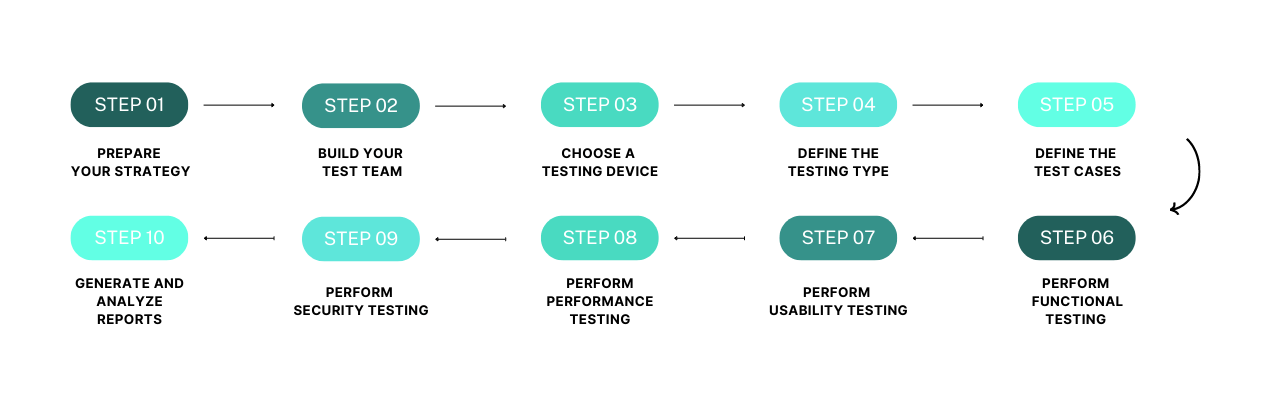
- Step 1 – Prepare Your Strategy
- Step 2 – Build Your Test Team
- Step 3 – Choose a Testing Device
- Step 4 – Define the Testing Type
- Step 5 – Define the Test Cases
- Step 6 – Perform Functional Testing
- Step 7 – Perform Usability Testing
- Step 8 – Perform Performance Testing
- Step 9 – Perform Security Testing
- Step 10 – Generate and Analyze Reports
Step 1 - Prepare Your Strategy
Like the game of chess, the apps you develop should be well-crafted and strategized to guarantee the highest probability of success. In the process of developing an app, your test plan will be a blueprint for testing and evaluating it against its utility and scope of improvement.How do you create this test plan? In concrete terms, you need to identify the app’s objectives, set specific goals and test criteria, and map out how you intend to achieve them. The idea is to identify the features that your app must support and the functional requirements it must satisfy. This will further help you determine the nature of the testing to be performed, the scope of testing, and the testing tools and strategies to employ.
SUGGESTED READ - 10 Mobile Testing Types and Approaches
Step 2 - Build Your Test Team
You can now determine the expertise and number of testers you need to assign based on the plan you created. The size and diversity of your testing team will depend on the complexity and level of risk associated with the app. But more so, it would take into account:
- The functional nuances and features of the app
- The performance-related aspects that the app must support, such as network and load testing
- The affinity that the app must exhibit with the devices it will support
- The UI/UX profile of the app
- The price, cultural, and geographic data of your target users
- The nature of the testing device – emulator or real device?
Step 3 - Choose a Testing Device
Emulators or real devices? Or simulators? You must decide if you’ll pursue your testing with emulators or real devices.
Emulators are software that can imitate a mobile device’s functionality and have it represented on a desktop. However, they might not be able to satisfy the testing requirements for the involvement of mobile-specific hardware. For instance, gestures, the camera, GPS, gyroscope, etc., cannot be tested on an emulator.
The same goes for a simulator, which is presumably a subtype of the emulator because it simulates a particular behavior of the mobile device.
Step 4 - Define the Testing Type
Your app needs to be tested for its functionality and efficiency across Android and iOS, not to mention its performance and various form factors across different devices. Hence, what it needs is a holistic testing program characterized by the following types of testing:
- Automated Mobile App Testing: With minimal human interaction, test automation helps you measure your app’s performance objectively and repeatedly. The tests run 24/7 and facilitate high reusability. Some examples include functional testing, extensibility testing, etc.
- Manual Mobile App Testing: Manual testing is vital for discovering high-risk or complex issues that automation may overlook. It’s a time-intensive process but allows for a better perspective on the app’s interface, usage, and effectiveness. Hence, some examples include exploratory testing, usability testing, acceptance testing, system testing, etc.
Step 5 - Define the Test Cases
Test cases are a set of conditions, actions, and expected outcomes that your app must pass. They help you confirm that your app is working as intended and can be effectively used in various situations and settings.
For instance, fundamental app functionality such as login and logout, accounts set up, recurring appointments, options for comments, etc., can be tested using test cases. These test cases could read like this:
- Verification of a user’s ability to create an additional account within the app
- Provision of statistics for users who have scheduled meetings
- Validation of the UI, including the interactions with various form fields and links
Step 6 - Perform Functional Testing
From here on, your testing program focuses on testing user flows and app features against the set requirements. The focal point of functional testing is to ensure that these features work as intended and can be used for their core purpose. The primary focus is on the app’s structure and form, content, and various associated dynamic factors.
For example, here’s a typical set of functional testing:
- Verify if the app installs correctly
- Test if all links, buttons, tooltips, etc., are active
- Verify if push notifications are working
- Verify if the transactions are conducted successfully
- Test if the app can accommodate users with visual impairments, such as blindness and low vision
- Verify if the app supports accessible content for people with disabilities, etc.
Step 7 - Perform Usability Testing
Usability testing is a crucial part of the app development process that involves evaluating how people will navigate through the app and how easy or difficult it is to use. It’s a highly subjective process that depends on users and task scenarios.
An excellent approach to testing for usability is by following usability heuristics. These include communicating the system state to the user, reducing the user’s mental effort, providing users with flexibility, improving learnability, preventing errors from creeping up, following an aesthetically pleasing design, etc.
Here are a few examples of usability testing:
- Verifying if the app supports a set of features that can be accessed easily and intuitively
- Verifying if service delivery/support response time is good
And a good way to go about evaluating these heuristics is by segregating the usability testing phase into different testing facets:
- Compatibility Testing: It examines the app for its compatibility with the devices on which it’s bound to run.
- UI Testing: It verifies if the visual appearance and layout of the app are in-sync with the intended user experience.
- Accessibility Testing: It ensures that the app is easily accessible and “usable” for the targeted user persona – even if their demographic or functional requirements differ. Practically, UI testing is very much a part of accessibility testing.
Step 8 - Perform Performance Testing
Stability, reliability, and responsiveness are critical factors for the success of your app. Performance testing ensures that the app is fast, consistent, and free of glitches. It must remain stable under various scenarios and settings and exhibit excellent loading speed.
As such, performance testing aims to:
- Test the load time of the app
- Test the operability of various features
- Test if there are any bugs or app crashes against loads
- Test if concurrent usage of app resources can be satisfied
Step 9 - Perform Security Testing
Checking integrity to verify that the app has not been modified or tampered with in any way is a critical part of the app security process.
For instance, it’s essential to validate that the system is in the right state and isn’t vulnerable to external attacks. The testing method used depends on the tests required and the app’s architecture. Some examples are to check if the app is vulnerable to cross-site scripting, XSS, injection flaws, etc.
Step 10 - Generate and Analyze Reports
Once you’re done with the testing program, it’s time to generate reports to summarize the results. The report should encapsulate what, how, and why something was tested. In addition, it should include the number of test cycles, how many test cases were executed, a summary of the issues encountered, and recommendations to mitigate any problems.
Conclusion
As it is, the mobile app development process is riddled with challenges and problems, forcing you to constantly take one step back to be able to take two steps forward. But with a proper testing program, you can mitigate these risks and expedite the development process, saving you time and resources in the long run.
A good testing program is critical to the success of any application developed on a tight schedule. And even if that’s not the case, it’s a good practice to test your app during various stages of development. This will help you identify bugs early on and have the right time to make necessary adjustments.
Check out ACCELQ, the only true no-code Mobile Test Automation Platform.

Nidhi Achhaa | Content Specialist at ACCELQ
Nidhi specializes in technology-based content and strives to create a unique, customized, and compelling piece with a flavor of SEO. A writer with a love for words and a storyteller at heart.
![]()
![]()
![]()